Do-it-yourself in the kitchen!
Every now and then, it's fun to change things up in the kitchen. Did you know you can make a lot of things yourself? Take a quick look at what you can make in the kitchen without having to buy anything yourself. If you don't have certain supplies yet, almost everything is available at a hardware store. Not only will you save money, but it's also a lot of fun to make something yourself.
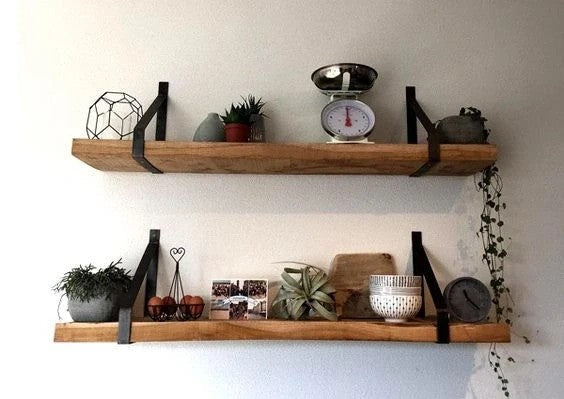
Wooden wall shelves
A wall shelf is the way to make your kitchen completely your own style with nice decorations, cookbooks, plants or tableware.
Supplies:
- Planks
- Screw machine
- Shelf brackets or other mounting materials
- Choose the right shelves that suit your interior.
- Saw the planks to size.
- Drill the holes in the wall and attach the shelf brackets to the wall.
- Then slide the shelf between the openings.
Coffee cup holder
Mugs and coffee cups are always put away in the cupboard, but how nice is it to use them as decoration? Even better, at the end of the day, you'll have a cupboard cleared out for other things.
Supplies:
- Long handles
- Crochet
- Drill
- Screws
- Cups
- Attach the long handles to the wall with screws.
- Place all the hooks on the handles.
- Then place the cups on the hooks.
Modern plate rack
A plate rack is often seen in country-style kitchens, but you can also give it a modern touch. For example, if you have an empty wall in your kitchen, a modern plate rack would be a great addition.
Supplies:
- Wall (lamella wall)
- Planks for the decorative moulding and as cross planks
- Wood glue
- Nails
- Purchase a screen for the wall. Consider a slatted screen, for example.
- Purchase planks for the molding, shelves, and cross beams
- Place the planks for the molding around the wall.
- Cut the planks that the signs will go on to the full width (from molding to molding).
- The shelves can be placed at the desired height using wood glue and nails.
- The cross beams can also be cut to their full width (place them here at the end of the molding). You can choose how many cross beams you place per plank.
- Attach the cross plank to the molding using wood glue and nails
Fresh herb rack
Do you also love fresh herbs? Then make a fresh herb rack. You can hang it in the kitchen, so you can easily access the herbs while preparing dishes.
Supplies:
- Planks
- (sandpaper and paint)
- Chalk or marker
- Pots
- Mounting brackets
- Contents of the jars
- Select the planks and cut them to size.
- Screw the mounting brackets onto the shelves.
- Write the names of the herbs on the board or on the pots with chalk.
- Fill the pots with a layer of potting soil and plant the herbs.
- Loosen the bracket and place the pot, then tighten it again so that they hang securely.
Pallet wine rack
A wine rack in your home is always a beautiful decorative piece. You could just as easily make one yourself. The great thing is that a pallet wine rack is so easy to make. It also looks fantastic!
Supplies:
- Pallets
- Saw
- Drill
- Plugs
- Blind shelf brackets
- Cut the pallets into pieces. You need the part that also has a bottom. This means you'll have three pieces per pallet.
- Drill holes in the wall and insert wall plugs.
- Place the blind shelf supports on the wall and the pallets
- Finally, add the wine bottles
Wooden knife holder
A knife holder saves you space in your cutlery drawer and it has a nice look.
Supplies:
- Wood/plank
- Pencil
- measuring stick
- Hinge milling cutter
- Magnets
- Sandpaper
- Kit
- Choose a piece of wood that you like or that you may still have lying around.
- Cut the wood to size.
- Draw a horizontal line in the middle of the back.
- Mark the location where the magnets should be placed. Keep a distance of 5 cm from the center of the magnet to the center of the next magnet.
- Using a hinge cutter, drill all holes for the magnets 15 mm deep.
- Lightly sand the wood.
- Attach the magnets to the holes with adhesive.
Note! First, test whether the knives stay in place with one magnet. If not, you can place two magnets in the recess.
Making a back wall from clay
A backsplash makes a big difference in the kitchen. You can also make one yourself out of clay, for example. You can make tiles out of clay and then grout them. How fun is that! You can use any clay (baked clay is stronger, though). It's easiest to buy white clay; you can always paint it later.
Supplies:
- Clay
- Glue
- Grout
- (Paint)
- Cut all equal pieces of clay.
- Let it dry well or bake it.
- Glue the tiles to the desired surface and fill the joints with grout.
Bar stool
Bar stools are often found in island kitchens. These kitchens have a special recess or bar where you can place the bar stools. You could also make a bar stool yourself out of wood.
Supplies:
- Wooden plate for the seat
- Sandpaper
- Saw
- Beams
- Wood glue
- Screws
- (paint, protective varnish)
- Make the seat round or square. Cut this plate to the desired shape and finish it neatly. Sand away any splinters with a sander or sandpaper.
- Cut the beams for the legs to the correct length. Do this carefully to prevent the bar stool from wobbling.
- Now cut the thinner slats or beams to size. For a stool with four legs, you'll need four beams; for three legs, you'll only need three. You can also choose to create a cross-member at both the top and bottom. This will make the bar stool even sturdier and give it a more robust look. Extra spacers are also handy for children, as they can use the footrest to climb onto the stool.
- Now it's time to connect all the separate parts. Do this with wood glue and extra screws for strength. It's important that everything is securely fastened.
- Sand away any remaining splinters and, if desired, give the bar stool a coat of paint. It's also a great idea to display the stool in the garden. In that case, it's wise to apply a protective varnish. Let it dry thoroughly, and you can enjoy the result!
Share:
Which kitchen layout suits you best?